
Review: Outmap - The mapping app trying to fill the hole Fatmap left
Price
Free, or US$4.99/mo (annual billing) or US$7.99/mo (monthly billing).
Or use this exclusive Backdrop discount link for 20% off!
Brand // Manufacturer
What we liked
The FATMAP DNA: Clean, high-contrast 3D visuals with web and mobile sync, keeping your lines in one place across both.
Superior Overlays: Critical data like Avalanche Risk and Aspect are refined and highly readable.
Winter Imagery: Best-in-class satellite shots that reveal the true face of the mountain.
The Spotter: A genius crosshair tool for instant distance, elevation, and vertical relief checks in the field.
GPX Management: Dead-simple import/export for planning and sharing lines.
What we didn’t
Technical Quirks: Occasional bugs on first load that a quick restart fixes.
BETA Coverage: Winter imagery is still inconsistent in certain European regions.
Route tracking: Bugs on Android and iOS, where tracking just stops
The Verdict
THE SHORT READ…
If you've been lost since FATMAP died, you may be able to stop searching. Outmap is the closest thing to what we had, and in some ways, it's already better. The Winter Imagery alone is worth the subscription — you'll finally see the mountain as it actually looks in January, not August. The terrain overlays are clean and readable: Avalanche Risk and Slope Aspect give you everything you need for planning your line, and the Flat Areas layer - important for splitboarders, keeps you moving when it matters. In the field, the Spotter is the kind of tool you didn't know you needed until you're standing on a ridge trying to figure out how far that exit really is. Plan on the web, navigate on mobile, download your sector before you leave the house, and you're set — signal or no signal.
THE LONG READ …
When I was planning this year's trip to Japan, I was trying to figure out exactly when and where to ride around the resorts. In the process, I stumbled upon a problem we've all been facing since October 1st, 2024. Our beloved freeride app, FATMAP, was dead, and Strava's promise to deliver an equal experience under their own brand never materialized.
Like everyone else, I set out to find the best alternative on the 2026 market. I cycled through four or five different apps—from onX Backcountry and Strava to OSMAnd (on IOS) —but none of them hit the mark. It was either a total lack of support for Europe and Japan, or the apps simply didn't play well with my iPhone, constantly crashing at the worst moments. Then, thankfully, I found Outmap.
When I first discovered Outmap, I'd been following Reddit threads suggesting it was a direct fork of FATMAP. That's exactly what sparked my interest. As it turns out, that wasn't true. However, the sunset of FATMAP pushed Outmap from a hobby project into a full-scale map client, and it shows. It's built on Mapbox— as FATMAP was—but utilizes its own custom engine for layers and 3D rendering. The project gained some serious weight when Charlie Boscoe—FATMAP's Chief Editor for seven years—came on board as Head of Content. And if that wasn't enough of a signal, Dave Cowell, FATMAP's original founder, is now advising the project too. Their involvement felt like a sign that the DNA of what made the original app so good—clean data and that specific community-driven feel—was actually being preserved here. The motivation was clear: bring back the features we actually loved—clean, high-contrast maps with essential terrain layers like slope angle and avalanche risk.
And the Winter Imagery? That's a whole other story we’ll discuss more here.
Quick note: Outmap is available on iOS, Android, and the web. I tested the Pro version throughout, so that's what most of this review covers. I've broken down what you actually get for free vs. pro at the bottom.
Visuals: Layers & Imagery
Since we're talking about a mapping tool, the layers are the alpha and omega. Outmap doesn't try to reinvent the wheel here; instead, it focuses on refining the essentials. You have your base maps, and you can overlay specific terrain data on top of them.
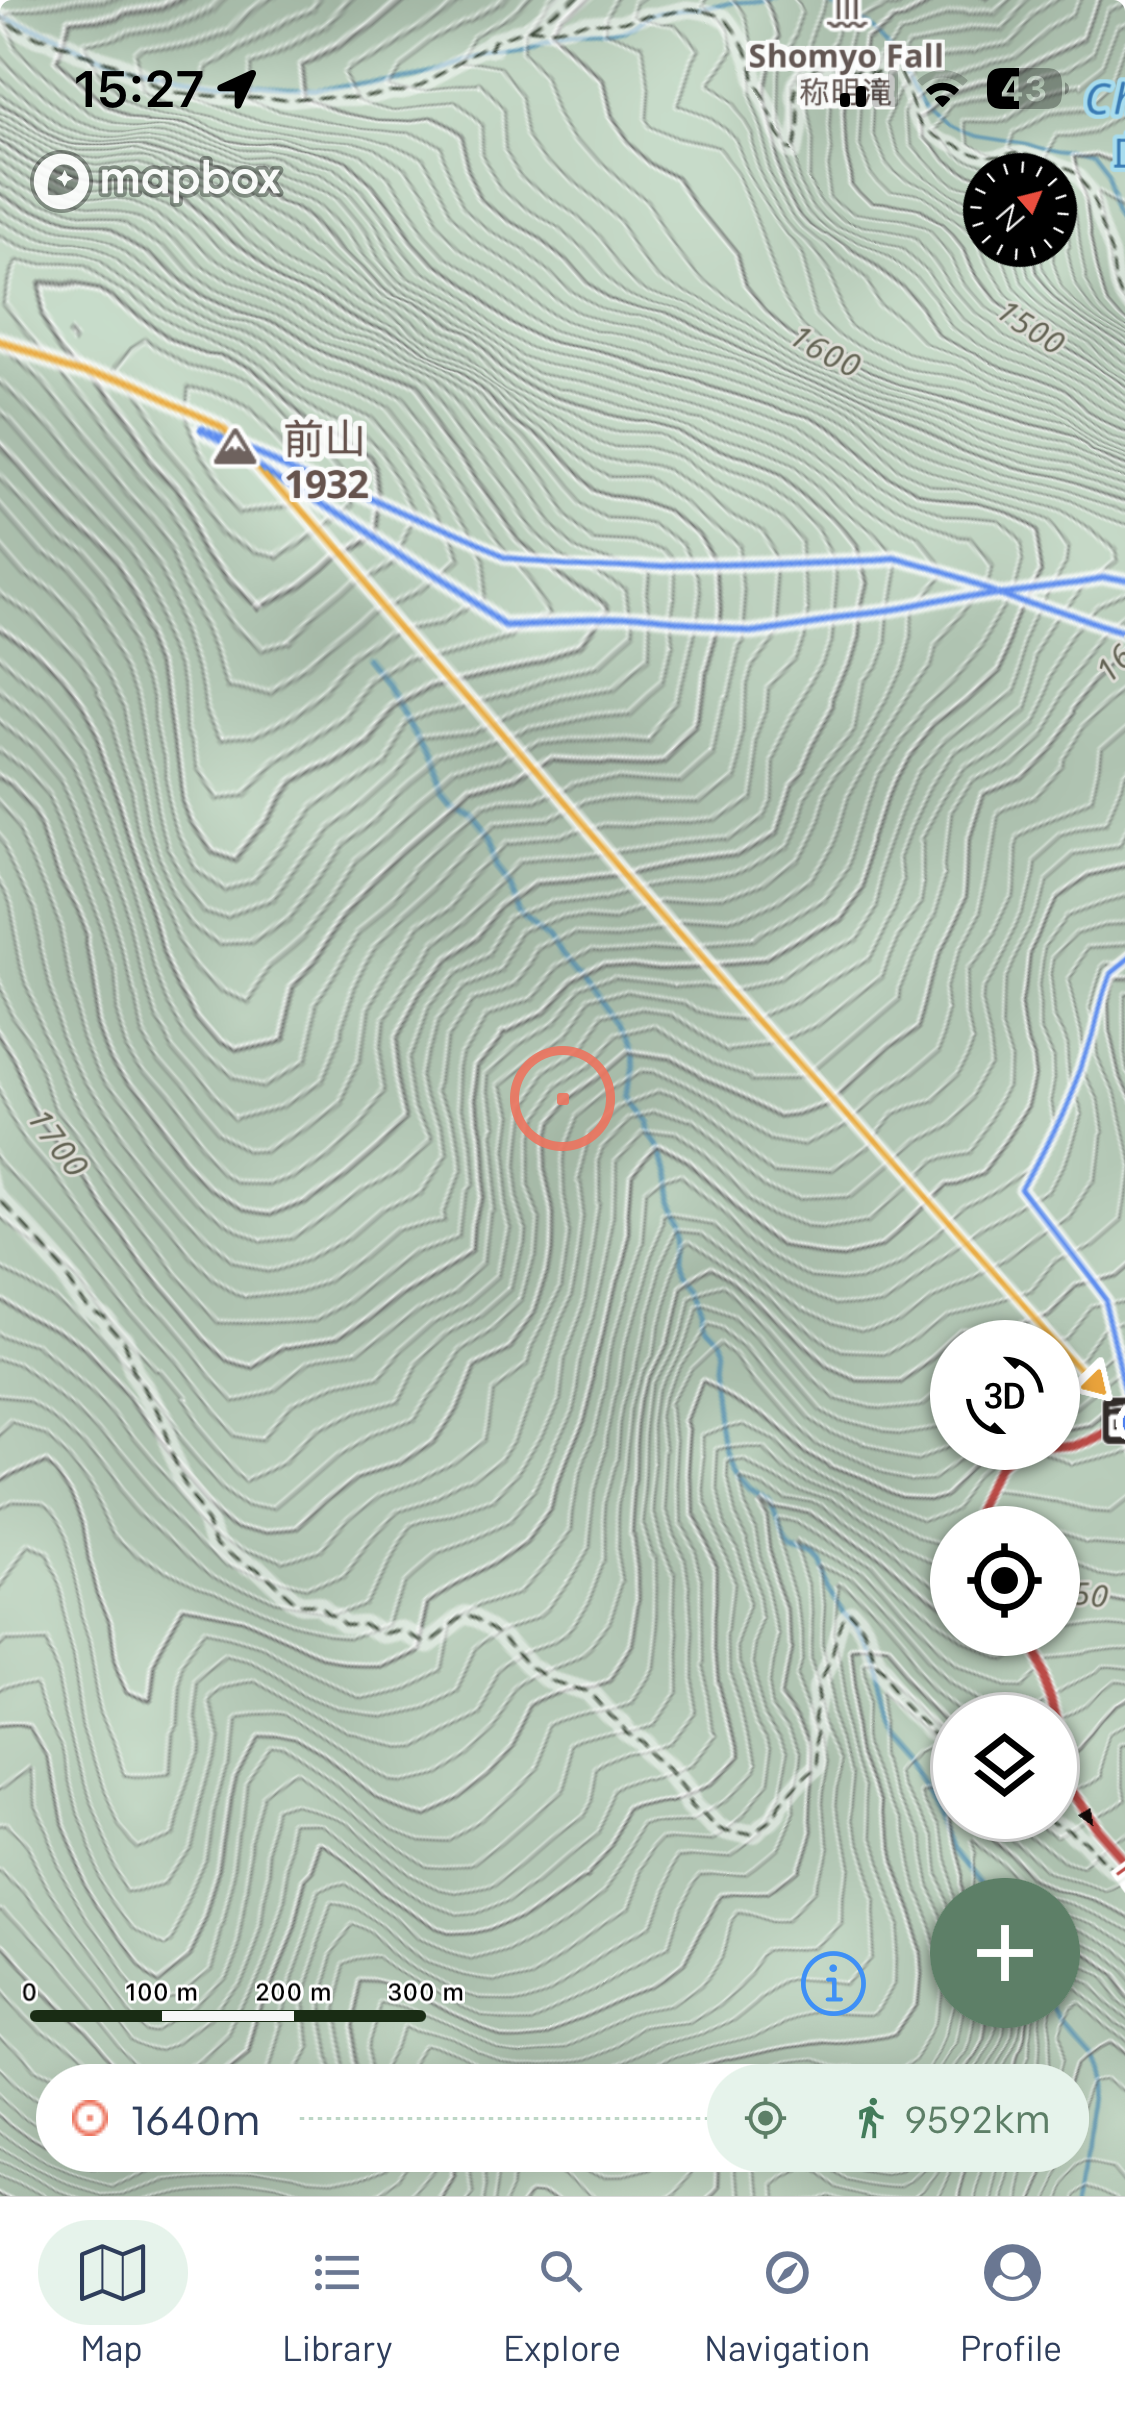
The base layers - You have three main options: Base, Satellite, and Adaptive.
The Base map is nothing special, but it's fast. Its biggest advantage is the loading speed—perfect for a quick double-check of the relief without worrying about vegetation or rocks.
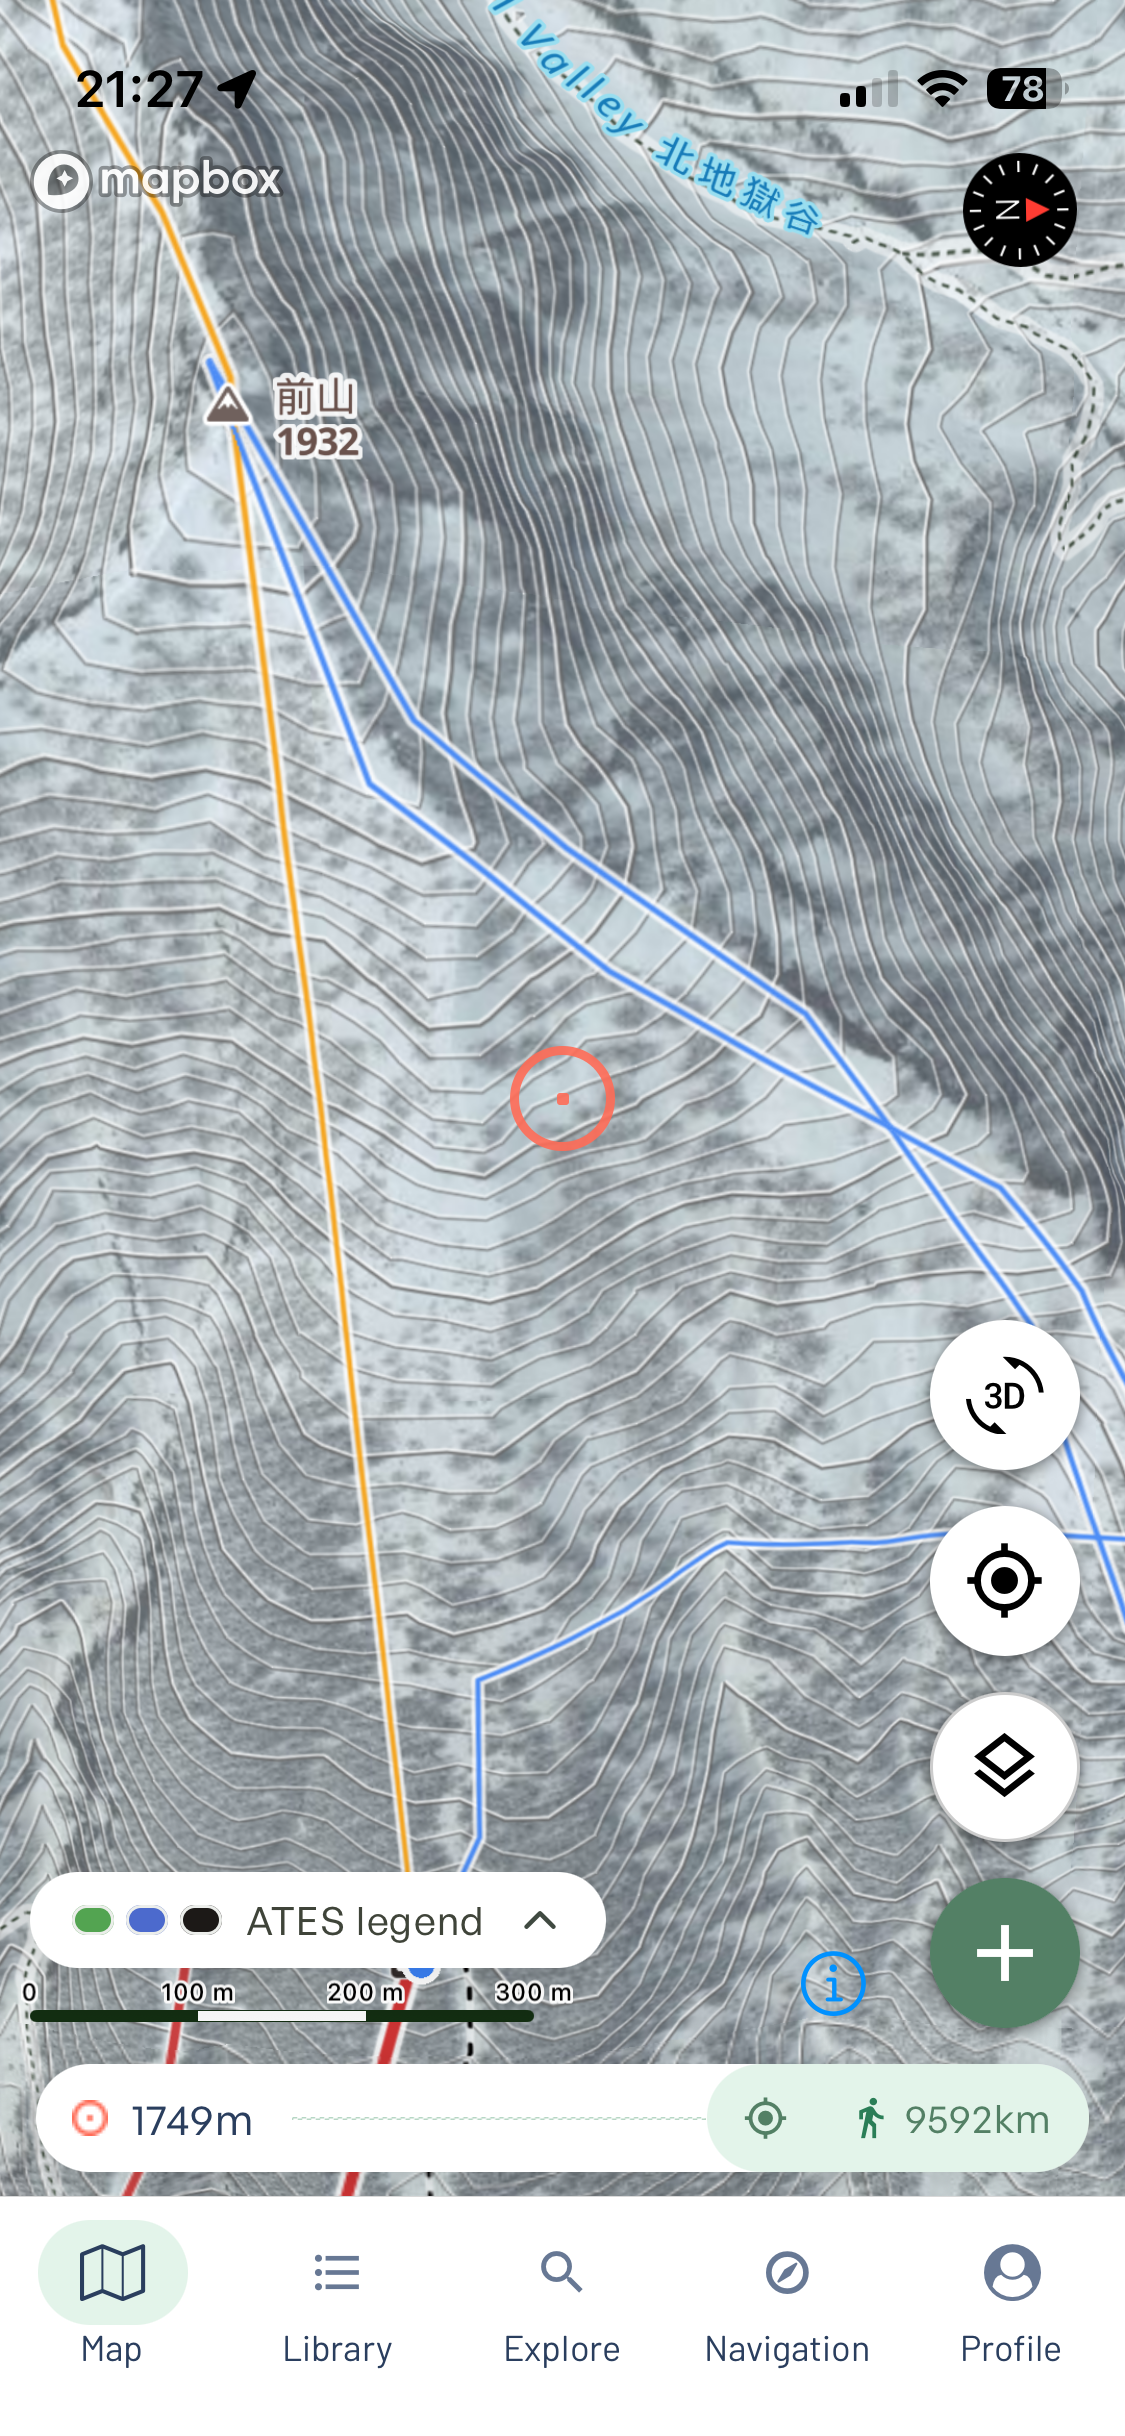
Then there is the Satellite view. While you can find this in almost any app, Outmap uses a mix of data, including Mapbox satellite view, which is optimal for global coverage. The difference compared to other map clients is that the images are post-processed to enhance contrast for the mountains. You can choose between Maxar or Mapbox sources, but let's talk about the real deal: Winter Imagery.
This is the biggest advantage and the closest thing to the old FATMAP. Most map providers take their satellite shots in summer for better quality and no clouds. For us, that's useless—you can't tell what is rideable terrain. Outmap exclusively licenses the clearest winter satellite images from providers like Maxar. It gives you a much better idea of where the snow ends, where the treeline actually starts, or how much snow a specific rock feature has for that Hail Mary jump. However, this is still in BETA. While I had no issues in Japan, I found that coverage can be hit or miss in Europe; for example, on some peaks in Aosta valley, Italy, winter imagery wasn't available at all, so I couldn't rely on it there.
The Adaptive view is a clever touch. It switches between the Base and Satellite maps based on your zoom level. Zoomed out, you see the clean Base map with peak names; zoom in, and it flips to the Satellite. It keeps you from getting lost in the area while you're looking for specific locations.
Base layer
Winter
Terrain Overlays: The Detail that Matters
What is a map without an overlay that actually tells you the details you need? For me, the following layers are the most critical for a successful day in the backcountry.
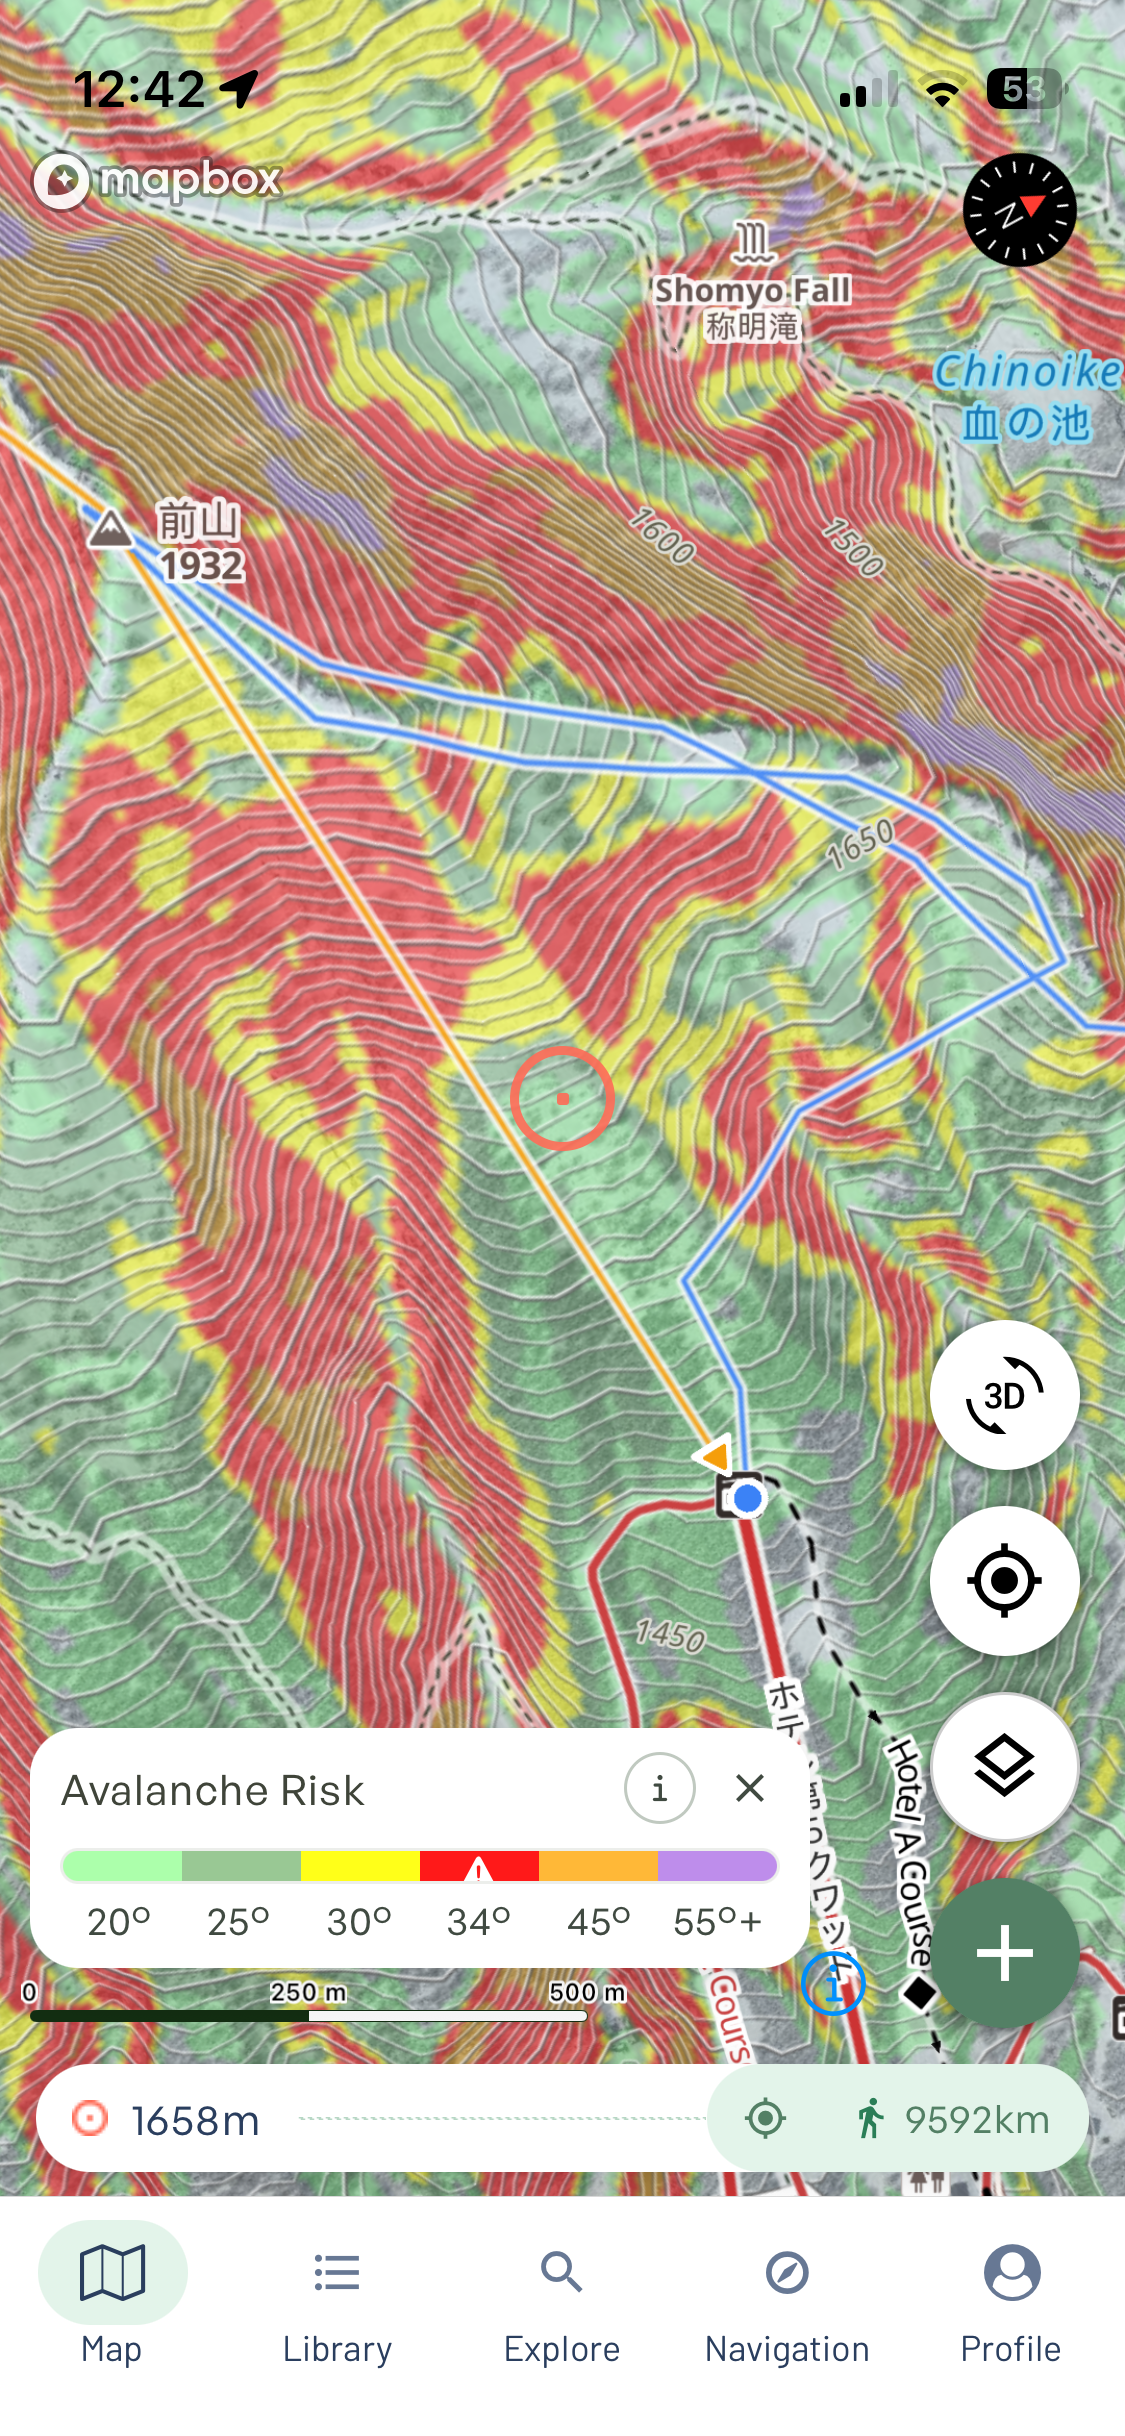
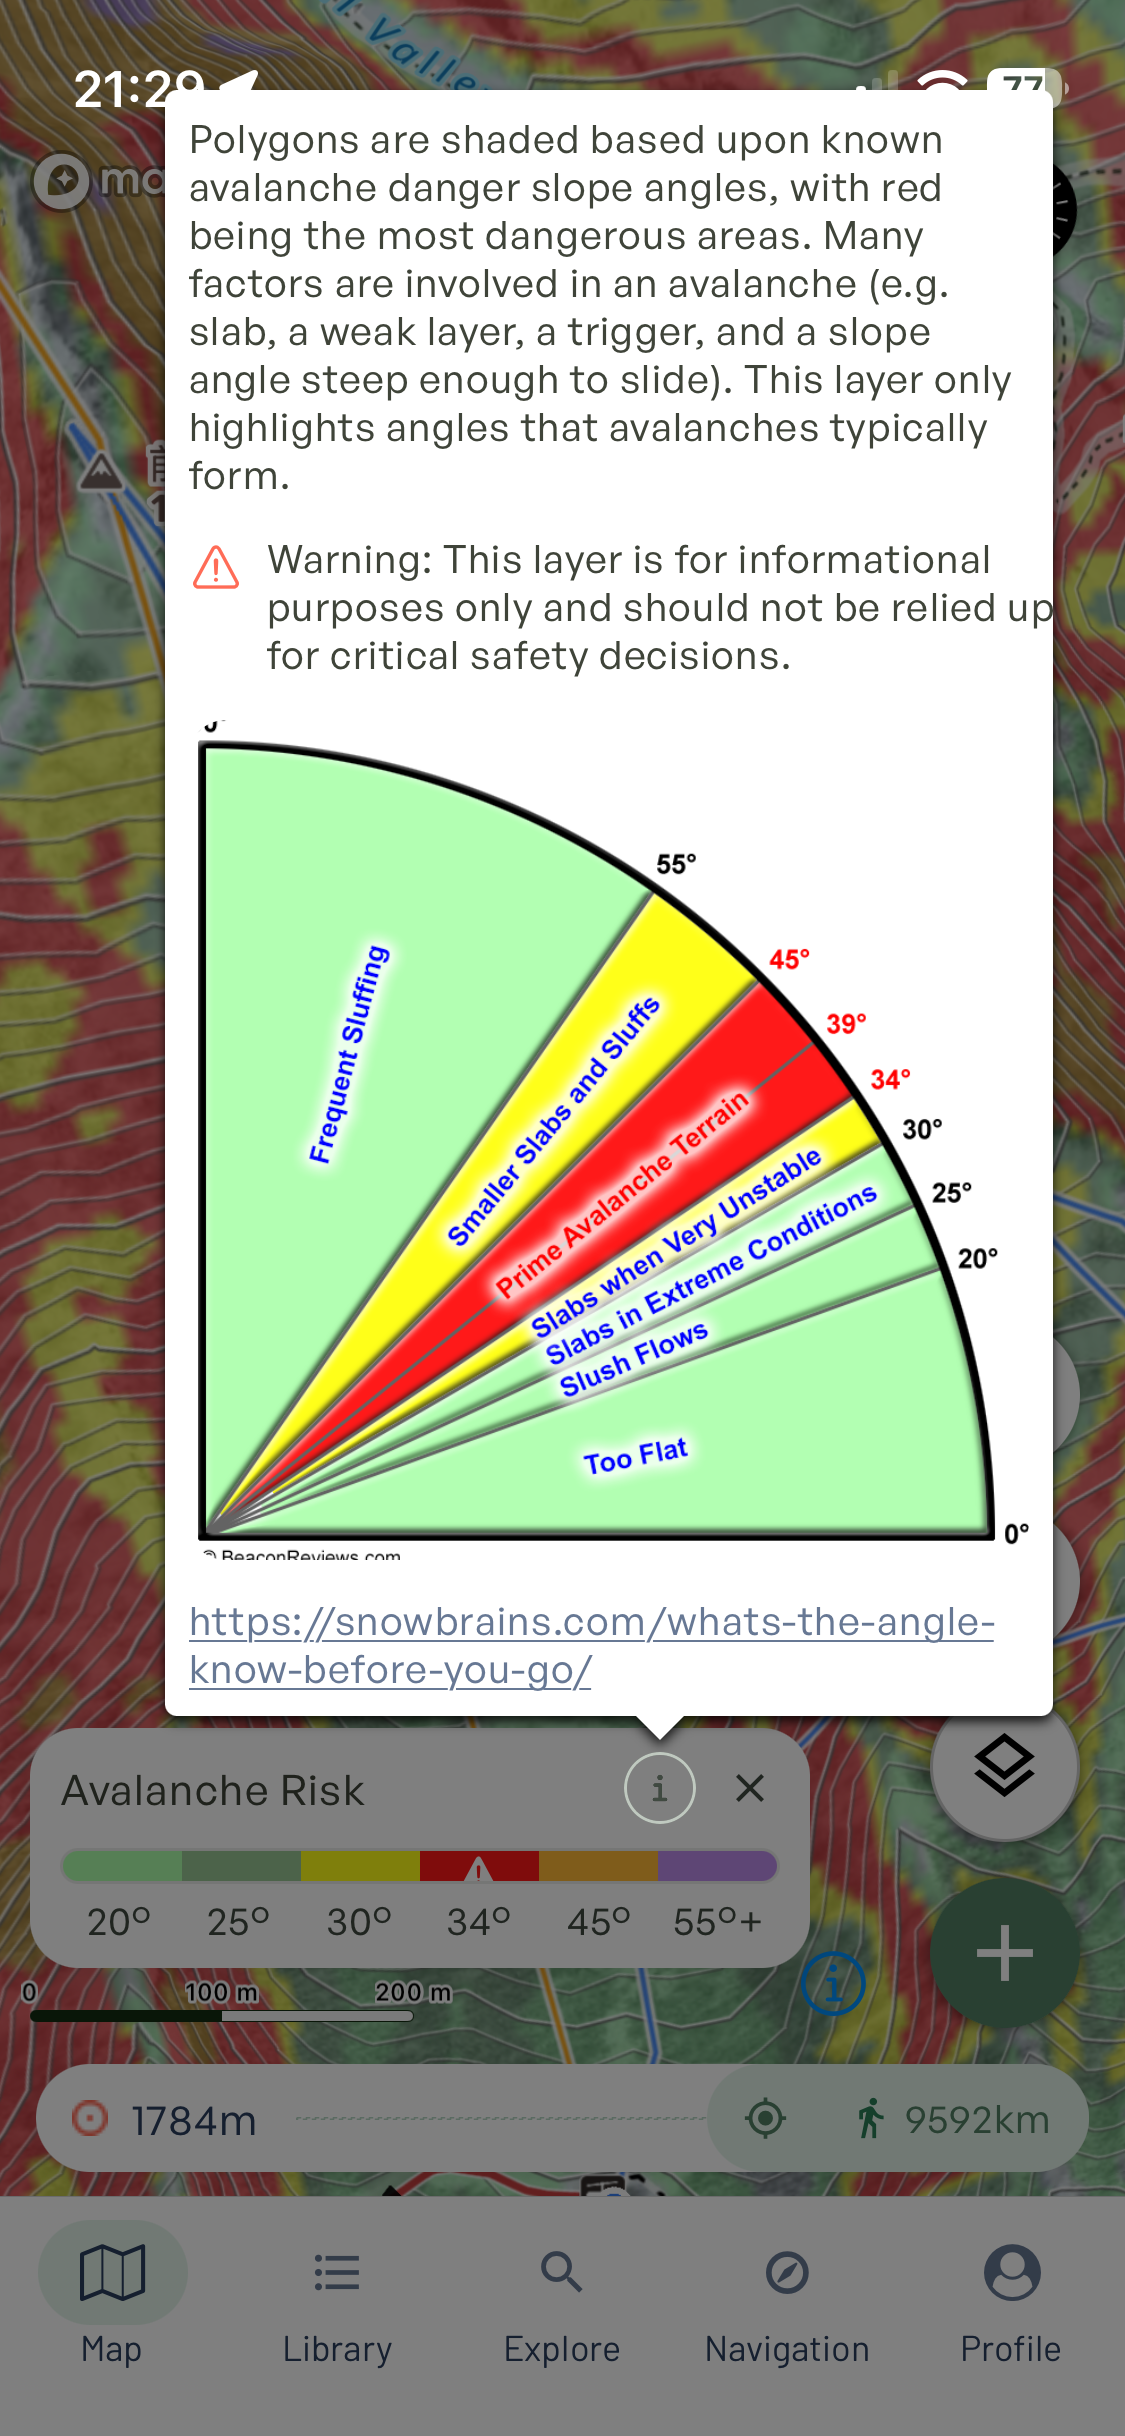
Avalanche Risk: In my opinion, the most important layer for both touring and planning. This overlay shows the most dangerous parts of the slope — which are arguably also the most fun to ride. The slope angle is colour coded across the full risk spectrum: Green (20-25°) is generally safe territory, though nothing is bulletproof at avalanche danger level 4 and higher, Yellow (30-34°) is where slides can already start, Red (34-45°) is prime avalanche territory, Orange (45-55°) is where sluffs and smaller slides are frequent, and Purple (55°+) means you're in serious terrain. Unless you've done your tests, know the snowpack history, and really know the area and conditions you're riding in, treat the red zones with maximum caution. It's about knowing what you're dropping into before you drop into it — and as Outmap themselves flag, this layer is informational only, not a substitute for proper field assessment.
Slope Aspect: This is a vital tool for planning, as long as you know how to read it. It doesn't magically find the best snow, but it visualizes slope orientation far better than any 2D map. If you've been tracking the weather and elevation, this layer helps you pinpoint which faces have been shielded from the wind or sun. The color scheme is mostly clear, though, since East is shown in white, it can occasionally blend into the Winter Imagery, leaving you wondering if you're looking at a compass heading or just a patch of snow. Still, it's great for spotting hidden faces that aren't obvious at first glance.

Flat Areas: As a splitboarder, you already know the pain of following your ski friends only to end up stranded in a flat area. This layer is a lifesaver. You can see exactly where the momentum dies, so you can plan your line to keep your speed or dodge those areas entirely.
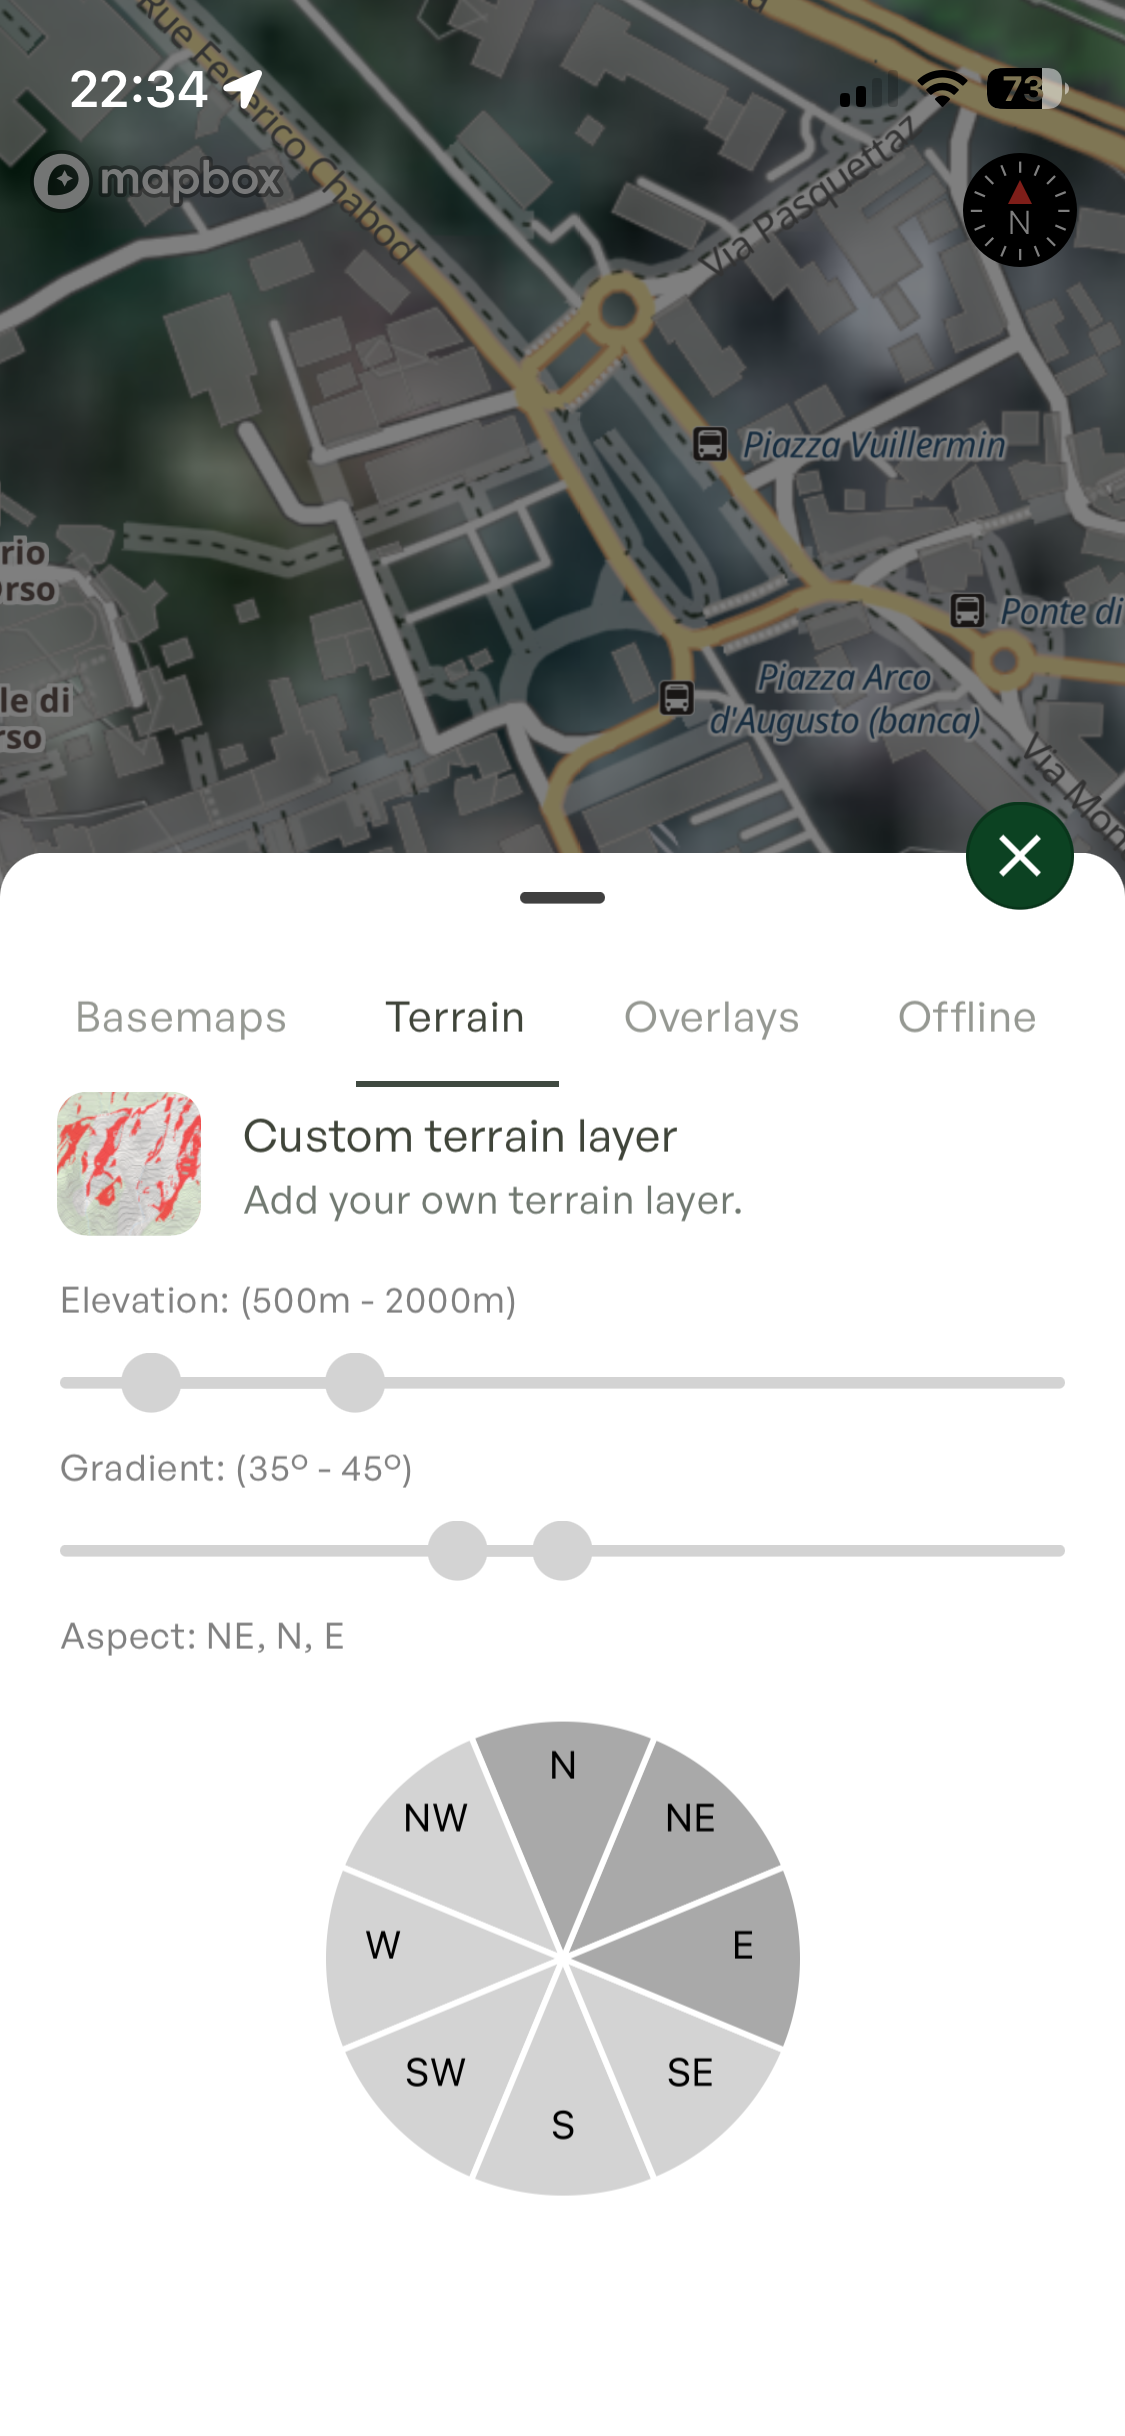
Custom Terrain Layer: A Pro-only feature that lets you combine slope aspect, gradient, and elevation into a single overlay. If you're the type who likes to build your own criteria for the perfect line, this one's for you.
Localized Overlays: Another nice touch is the ability to toggle mapped bike, hike, or ski tour trails, as well as local avalanche forecasts. However, keep in mind that these are currently much more robust in North America. For my European scouting, I couldn't really rely on them yet, but it's a nice-to-have feature if you're exploring Canada or the US.
Web vs. Mobile: The Planning and the Navigation
Outmap offers both a mobile app and a web browser version. However, these applications are not the same. While feature parity is apparently in the works, right now there's a clear divide in how you use them. You use one account for both, so any route you add or edit is visible in both environments, using the same layers and base maps.
The Web App
The web app is strictly for planning. Using a mouse or trackpad on a computer is much more comfortable for drawing lines—manually adding points on a mobile screen is just not ideal. The bigger screen is a massive advantage for precise route planning, allowing you to cross-reference Slope Aspect and angle to get the exact line you want.
The main catch is that the web app has no offline maps or GPS tracking, which is obvious since you're not taking a laptop on skin track with you. Also, a big heads-up: while the 3D functionality is technically there on the web, it simply doesn't work. For now, don't count on it for your planning sessions.
The Mobile App
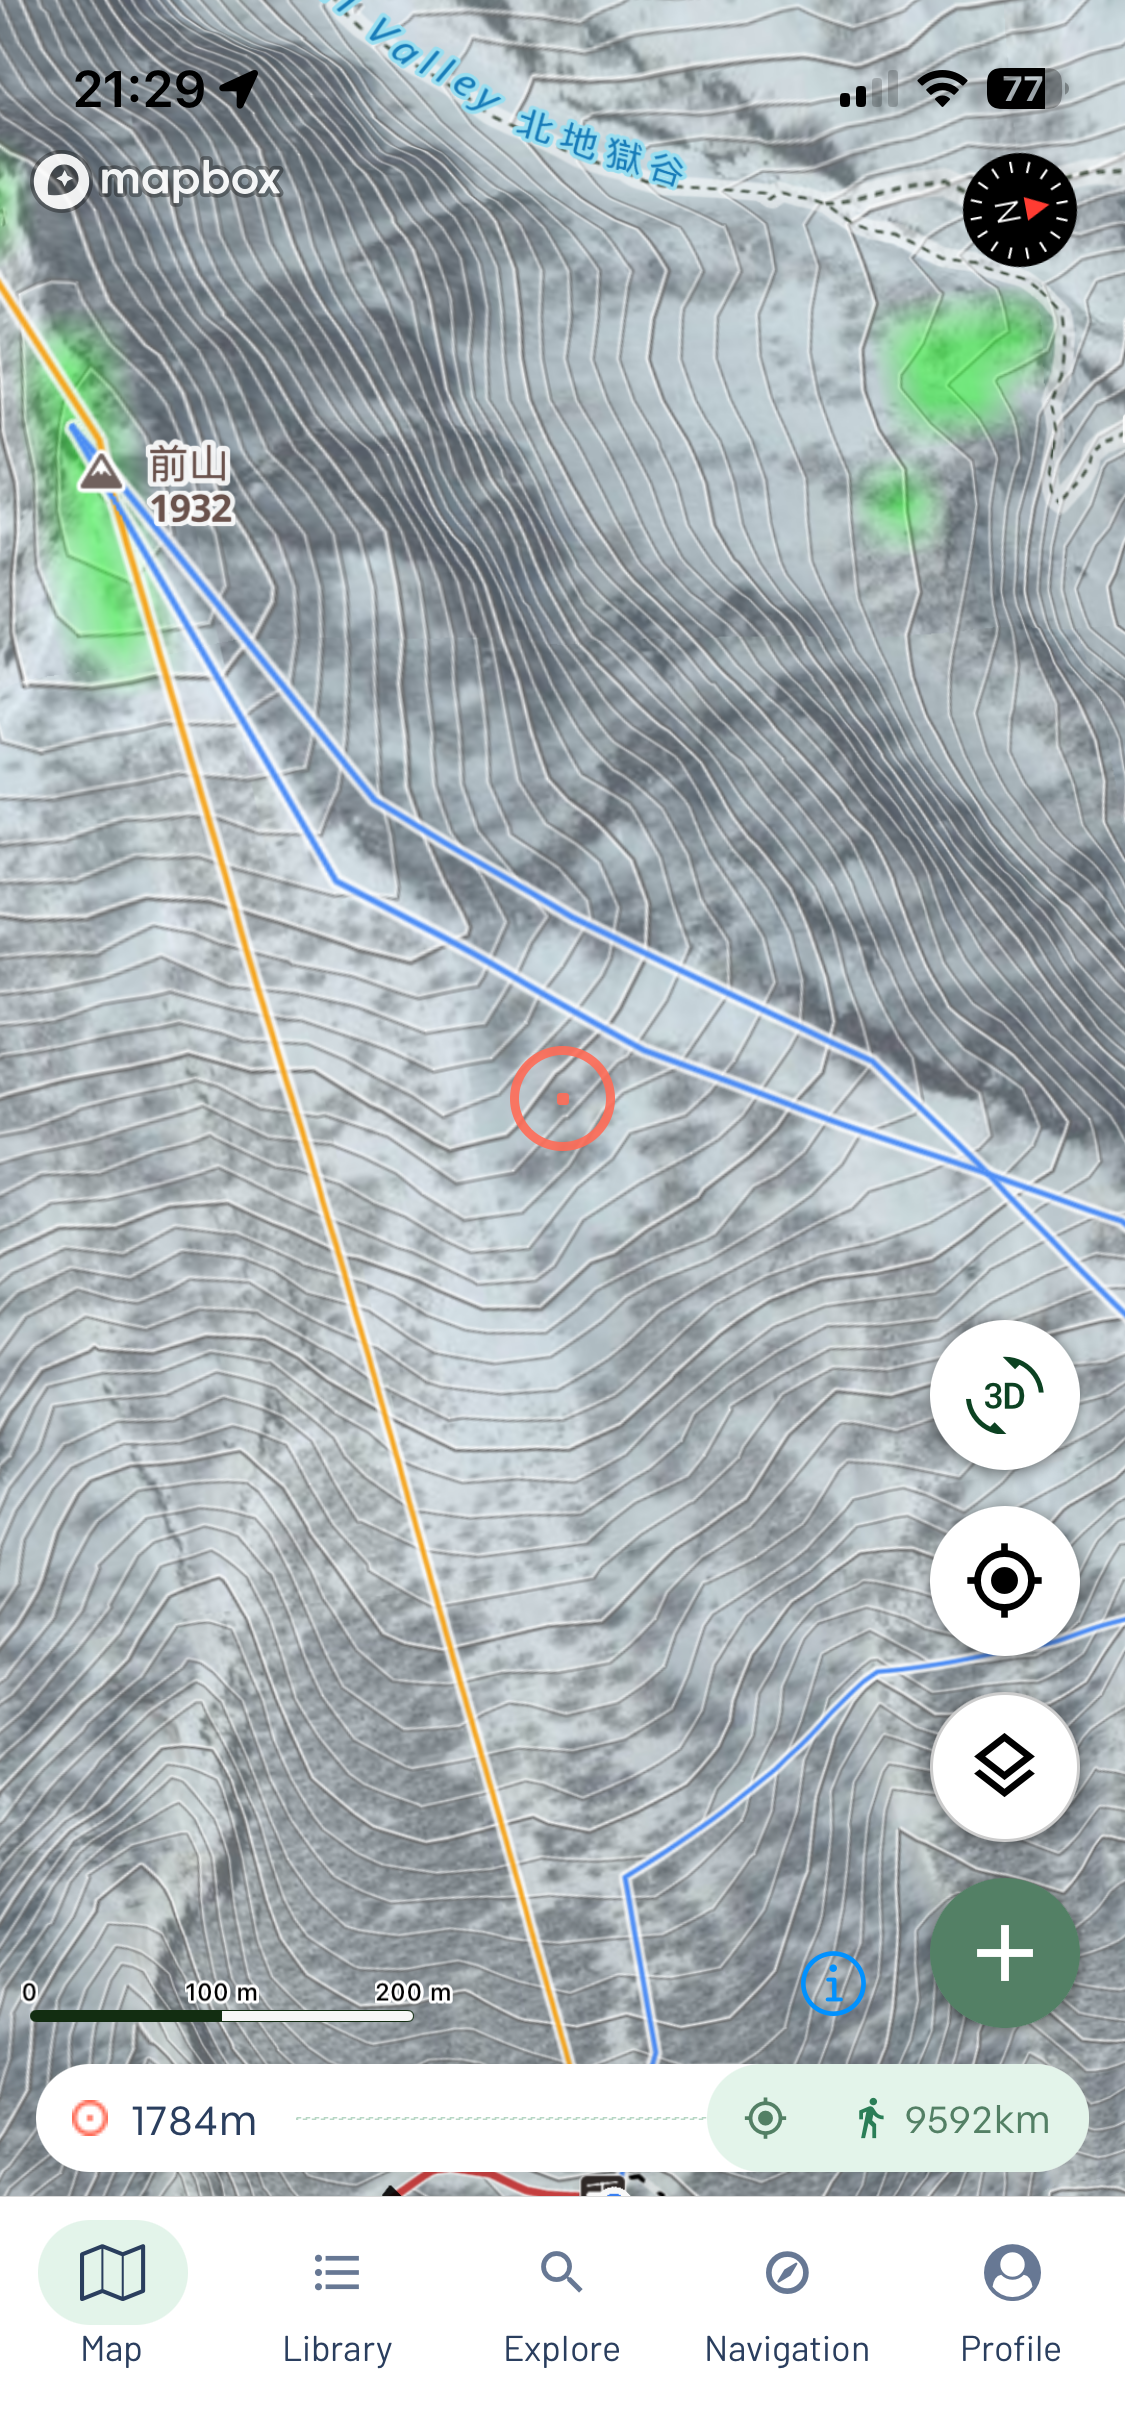
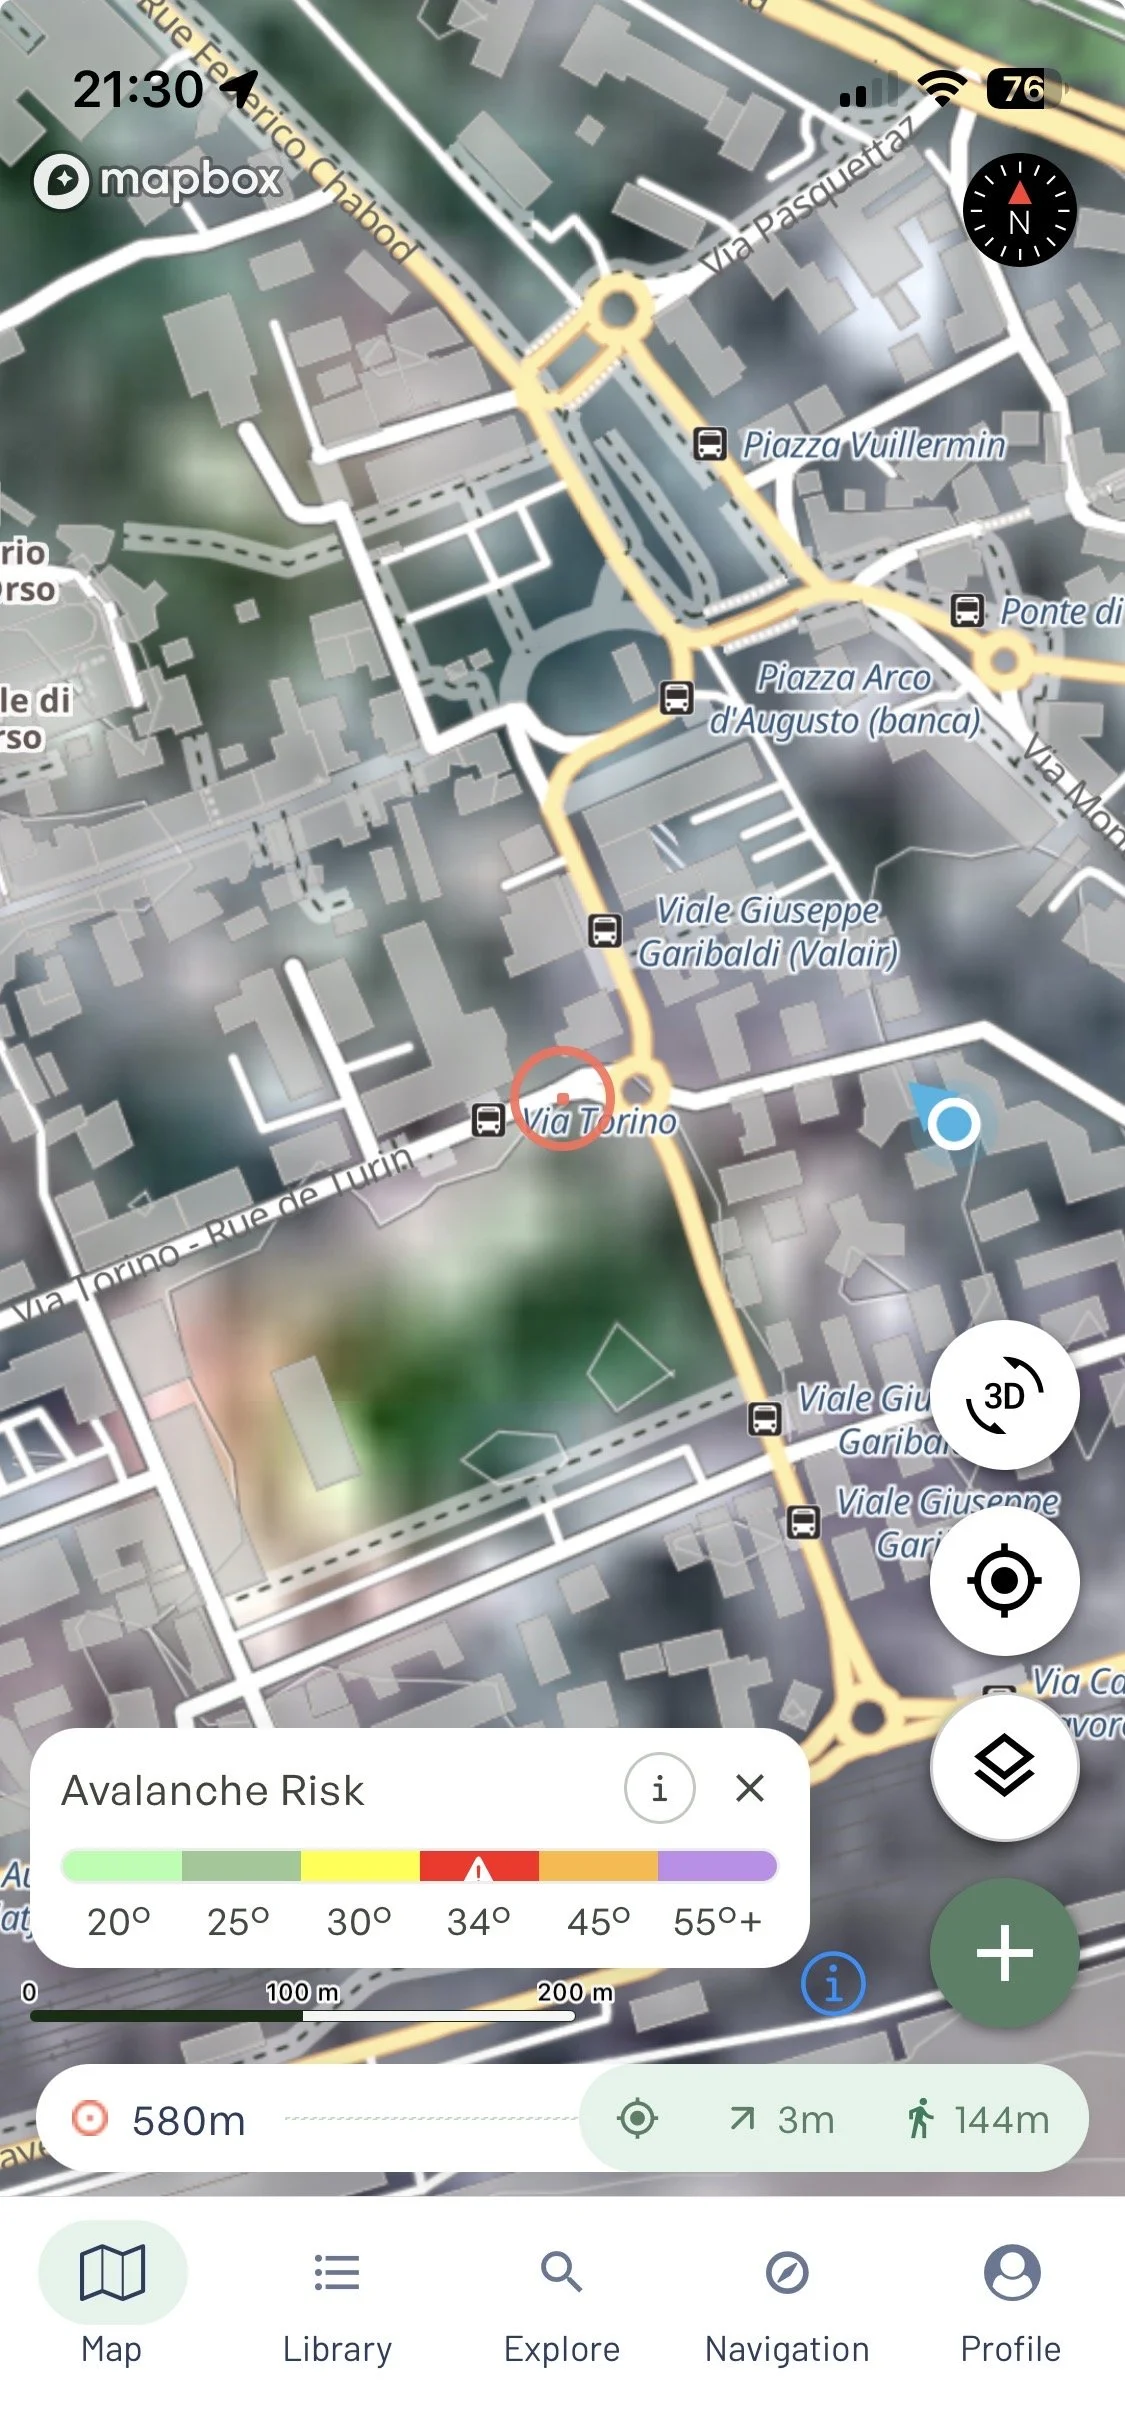
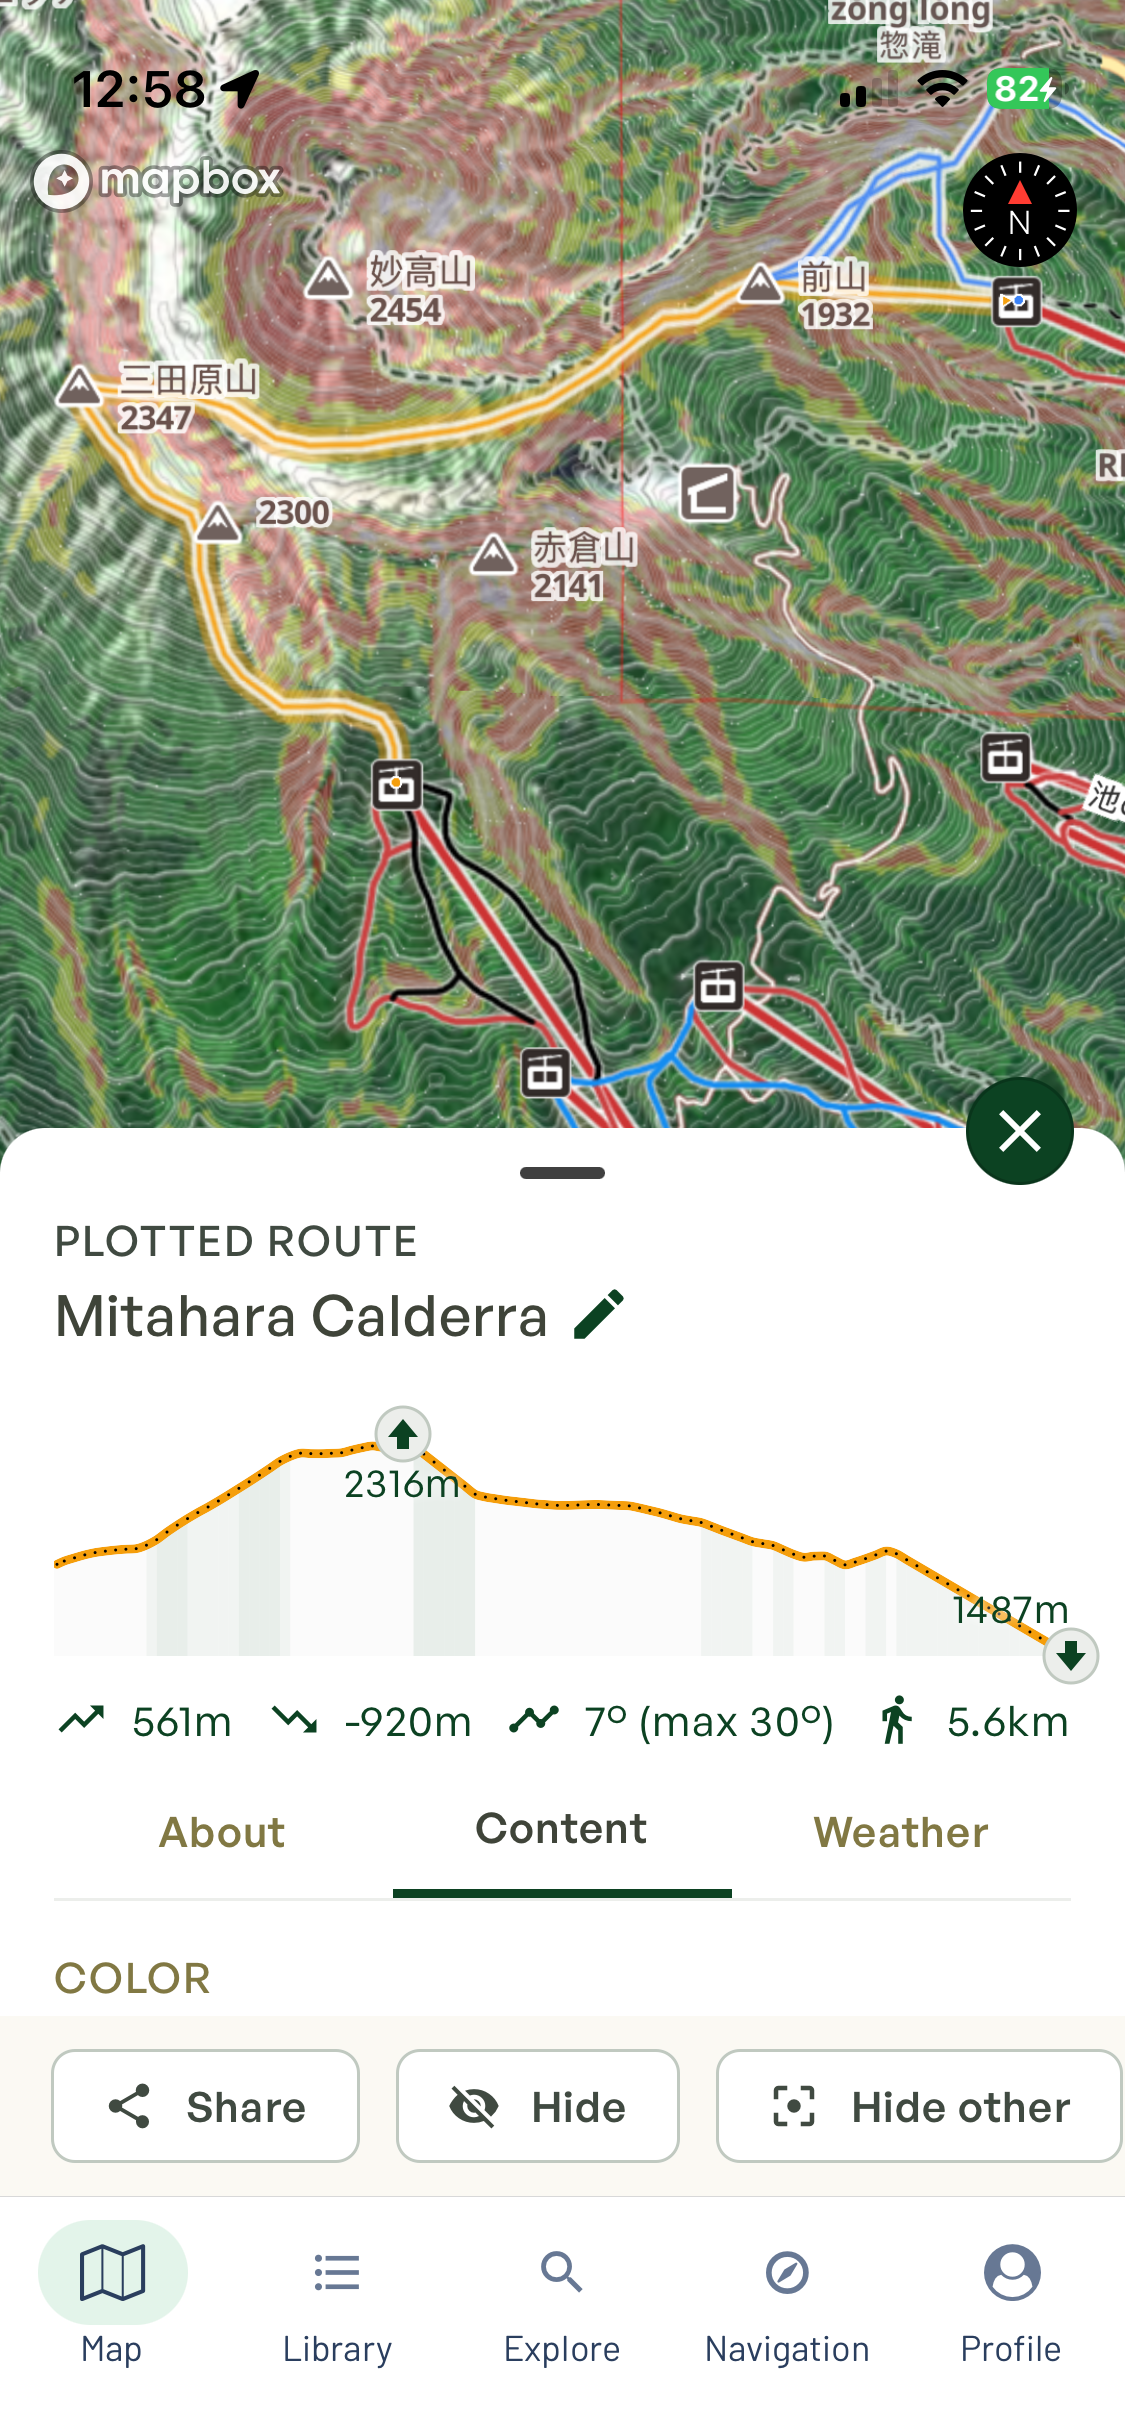
The mobile app is your actual navigation tool. It tracks your location to make sure you're staying as close to your planned route as possible. One helpful addition is the Spotter feature (see below - pointing somewhere in Italy!) — a target circle in the center of your screen with a matching readout bar at bottom of the screen, that shows you exactly how far you are from whatever point you're aiming at on the map.
In my experience, I usually need to make adjustments on the fly. Something I planned in the comfort of my apartment often doesn't reflect the reality of the terrain once I'm standing there. Having the layers on with the route overlaid helps me stay oriented and ensures I actually end up where I'm supposed to. The biggest advantage over the web version is, of course, the Offline Maps and the 3D functionality, which actually works on mobile. I didn't have a single issue using the offline mode in Japan, and it's definitely better for your battery life since the phone isn't constantly searching for a signal. That said, 3D mode is quite power-hungry, so you need to use it with some common sense if you're out for the whole day.
Workflow: Planning, Scrambling, and Going Offline
Since we've already looked at the Web vs. Mobile split, let's talk about how to actually get your lines into the app without losing your mind.
Planning a Route
Hit "Plan a Route," and you're straight into it. Drawing is freehand by default — placing points manually across the terrain — but there's a snap-to-road option that comes in handy if you're starting from a road or a resort. Let it handle the approach, then freehand from where things get interesting. Points are fully editable after placement, and you get a running elevation profile and distance as you draw. I'd rather come prepared and micro-adjust on the fly than wing it in the field.
Recording a Track
The "Record Track" function captures your run via GPS as you go — no planning, just logging what you actually rode or skinned. Useful if you know the terrain by heart or just want your stats from the day. Personally, I'm a "plan-first" guy, but for familiar terrain it does the job.
The GPX Scramble
Let's be real: half the time, we aren't planning from scratch. I'm usually using GPX files a friend sent me or something I managed to scramble from the dark corners of the internet. Importing is dead simple—choose the file, name it, and boom, it's there. Do yourself a favor and do this on the web app; trying to manage folders on a phone with frozen fingers is a battle you don't need.
Offline Mapping: High-Res Reality
Cellular data is the first thing to die when you drop into the bowls you're exploring. Fortunately, it's easy to download the sector you need. You simply go to the layers and pinpoint the area you want to download. A really nice touch that I appreciate is that you can choose the imagery quality of your sector. To me, this matters when I try to find perfect features in the line while I am planning it. I tested this in Japan and have to say it was pretty consistent — my downloaded sector matched reality without a single hiccup, exactly what you need when you're out there.
The Reality Check: Dealing with the Quirks
No app is perfect, and Outmap is no exception. I hit a few bugs along the way — the vertical profile occasionally flatlines on first load and during planning, the Spotter pointer sometimes hangs before showing correct elevation data, and the lack of 3D on the web app means you'll find yourself double-checking your planned route on mobile. Nothing that had me throwing my phone at the wall, but worth knowing before you head out. On the recording side, other members of the Backdrop crew hit crashes on both Android and iOS — it didn't affect me personally, but it's worth flagging. Battery drain during recording is also something to keep in mind if you're on an older device or have a long day out. As for reporting bugs — there's a Send Log function in the app, which is a start, but it's unclear whether it's actively monitored by the dev team. OsmAnd handles this well — users can log issues directly and get notified on progress. It's the kind of transparency that builds trust, and something Outmap could look at adopting as they grow. The good news is the dev team pushes updates consistently, so by the time you read this, some of these might already be history.
Pricing & Features: Free vs. Pro
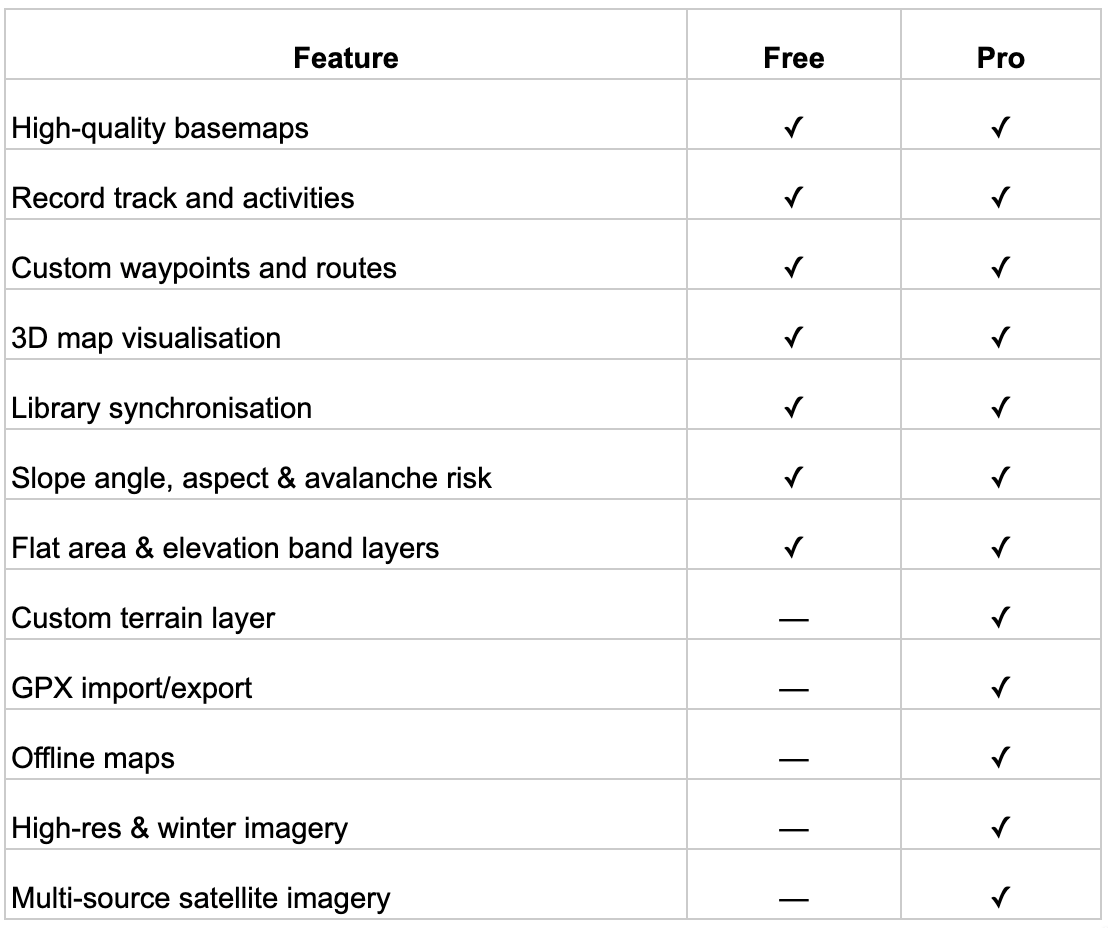
The Free version is genuinely useful — you get 3D visualisation, slope angle, aspect, avalanche risk, and flat area layers out of the box, which is already more than most apps offer at zero cost. But if you're serious about backcountry movement, Pro is where it gets real. Offline Maps and high-resolution Winter Imagery are the two features that will actually change how you plan and navigate, and the custom terrain layer is a nice bonus for anyone who likes to get nerdy with their line selection.
Pro runs €7.99/month or €59.99/year (roughly €4.99/month). Personally, I go monthly — I subscribe at the start of the season and cancel when the snow's gone. If you're a year-round hiker or biker, the annual plan makes sense, but for a dedicated winter user, the flexibility of monthly is hard to argue with.
SUMMARY…
I took this through the steeps of the Alps and the powder of Japan, and came back with something I reckon the splitboard community will really appreciate. If you've been lost since FATMAP died, Outmap could well be your answer. It's not perfect — some bugs are still there, and the Winter Imagery might let you down in certain European corners. But for finding those rideable gaps in the trees, keeping yourself out of flat spots, and actually knowing what you're dropping into, little else comes close right now.
The people who built Outmap clearly spend more time studying terrain than polishing a social feed — and that’s what we need.